
No products in the basket.
Preparing a natural henna paste is the first step to getting safe, smooth, and rich henna stains at home. It starts with fresh body art quality henna powder, a little sugar, a water-based liquid, and a safe essential oil. Then the paste rests until the natural dye wakes up and becomes ready for the skin. The best part is that you control everything, from the texture to the scent and final stain. Natural henna should turn orange first, then deepen into a reddish-brown colour.
Now let’s dive into this guide and learn each step in a simple, safe, and beginner-friendly way.
What Is Preparing a Natural Henna Paste at Home?
Preparing a natural henna paste at home means making fresh henna paste with simple, skin-safe ingredients. You mix henna powder, liquid, sugar, and essential oil. Then you rest the paste until the natural dye becomes active and ready to stain the skin. This lets you choose every ingredient yourself.
When you are preparing a natural henna paste at home, you are bypassing the mass-produced, shelf-stable cones found in many high-street shops. Those pre-made cones often contain preservatives and solvents to keep them liquid for months. Fresh henna is a perishable product. It is at its most potent the moment the dye is released.
By making it yourself, you control the “Lawsone” (the henna dye molecule). You learn to recognise the earthy scent of the plant and the way the paste behaves. This process is rewarding because it transforms a dusty green powder into a luxurious, silky cream that creates beautiful art. Beginners should avoid shortcut recipes that suggest boiling the henna or adding harsh chemicals, as these often ruin the dye or irritate the skin.
The fact is that fresh henna gives you more control.
Why Make Natural Henna Paste Instead of Buying Ready-Made Cones?
Homemade henna paste is fresher, safer, and easier to control. Ready-made cones can lose strength when they sit too long on shop shelves. Some cheap cones may also contain unknown additives, strong smells, or chemical dyes that do not belong in natural henna paste, potentially causing allergic reactions or poor stains.
Think of henna like fresh food. A freshly baked bread has a soft texture and a wonderful aroma. A bread that has been sitting in a plastic bag for three months is only fresh because of chemical preservatives. Ready-made cones sold at room temperature are often “dead” or kept “alive” with harmful additions.
When you make your own:
- Choose the powder: You can ensure it is “Body Art Quality” (BAQ), which is finely sifted.
- Control the scent: Instead of a chemical smell, your henna will smell like calming lavender or refreshing tea tree.
- Safety is guaranteed: You know there is no PPD or kerosene in your mix.
- Custom Texture: Some artists like a stringy paste for long lines, while others prefer a creamy paste for shading. You can decide.
The surprising part is that freshness can change the whole stain.
What Ingredients Do You Need for Natural Henna Paste?
Natural henna paste needs four main ingredients: body art quality henna powder, a water-based liquid, sugar, and a skin-safe essential oil. Each ingredient has a clear job. The powder gives the dye, the liquid releases it, sugar helps it stick, and oil supports the stain depth and longevity.
| Ingredient | Main Job | Beginner Tip |
| Body Art Quality Henna Powder | Provides the natural Lawsone dye | Use fresh, triple-sifted powder (look for green, not brown). |
| Water or Lemon Juice | Acts as the solvent to release dye | Distilled water is fastest and easiest for UK beginners. |
| Sugar | Humectant (keeps paste moist/sticky) | Use more sugar in dry weather to prevent the paste from cracking. |
| Essential Oil (Terps) | Dissolves dye and improves colour | Stick to Lavender for kids, pregnant women, or sensitive skin. |
| Extra Liquid | Final texture adjustment | Add only a few drops at a time at the very end. |
The simple fact is that every ingredient has a clear job. Using high-quality natural henna paste ingredients is the foundation of a successful design. If one part of this foundation is weak, the final stain will suffer.
Which Henna Powder Is Best for Skin Designs?
Fresh body art quality henna powder is best for skin designs. It should be finely sifted, fresh, and made for body art, not hair dye. Better powder makes smoother paste, cleaner lines, fewer clogs, and stronger stains. Look for “BAQ” on the label to ensure it is premium grade.
When shopping in the UK, avoid the cheap boxes of henna in grocery aisles meant for hair colour. Hair henna often contains metallic salts or remains gritty because it does not need to flow through a tiny cone tip. Body art quality henna powder is sifted multiple times (triple-sifted) until it is as fine as icing sugar.
- Rajasthani Powder: Known for being stringy and elastic, perfect for those long, intricate Mandalas.
- Jamila Powder: Known for being creamy and smooth, often preferred for filling in large shapes or doing traditional Moroccan styles.
- Freshness Check: Good powder should be a vibrant, pea-green colour. If it looks brownish-grey, it is old and the dye may have expired.
What matters most is that you start with the right powder.
Which Liquid, Sugar, and Essential Oil Should You Use?
Choosing the right components is the secret sauce of henna art. While the powder provides the colour, these three ingredients determine how that colour gets onto the skin and how long it stays there.
What Liquid Should You Mix With Henna Powder?
Use a water-based liquid for henna paste. Water is simple and beginner-friendly. Lemon juice can also work, but it may slow dye release due to its acidity. Oil should not replace water or lemon juice because henna needs water-based moisture to release its dye molecules effectively. Many UK artists wonder what liquid to mix with henna; the answer is usually distilled water for a reliable, fast result.
Why Do Henna Artists Add Sugar to Henna Paste?
Sugar in henna paste acts as a glue. Without it, the paste would dry quickly and flake off your skin like mud. When it flakes off too soon, the dye does not have time to soak into the skin layers. Sugar keeps the paste flexible and tacky, allowing you to move your arm without the design crumbling away.
Which Essential Oil Works Best for Henna Paste?
Artists use oils high in terpenes to help darken the stain. The best essential oils for henna paste include tea tree, Cajeput, or Lavender. Lavender is the safest choice for general use. Avoid clove oil in high amounts as it can be very irritating to the skin, and never use “henna oil” from unknown sources as it often contains petrol.
The interesting thing is that small ingredient changes can change the final paste.
What Is the Best Natural Henna Paste Recipe for Beginners?
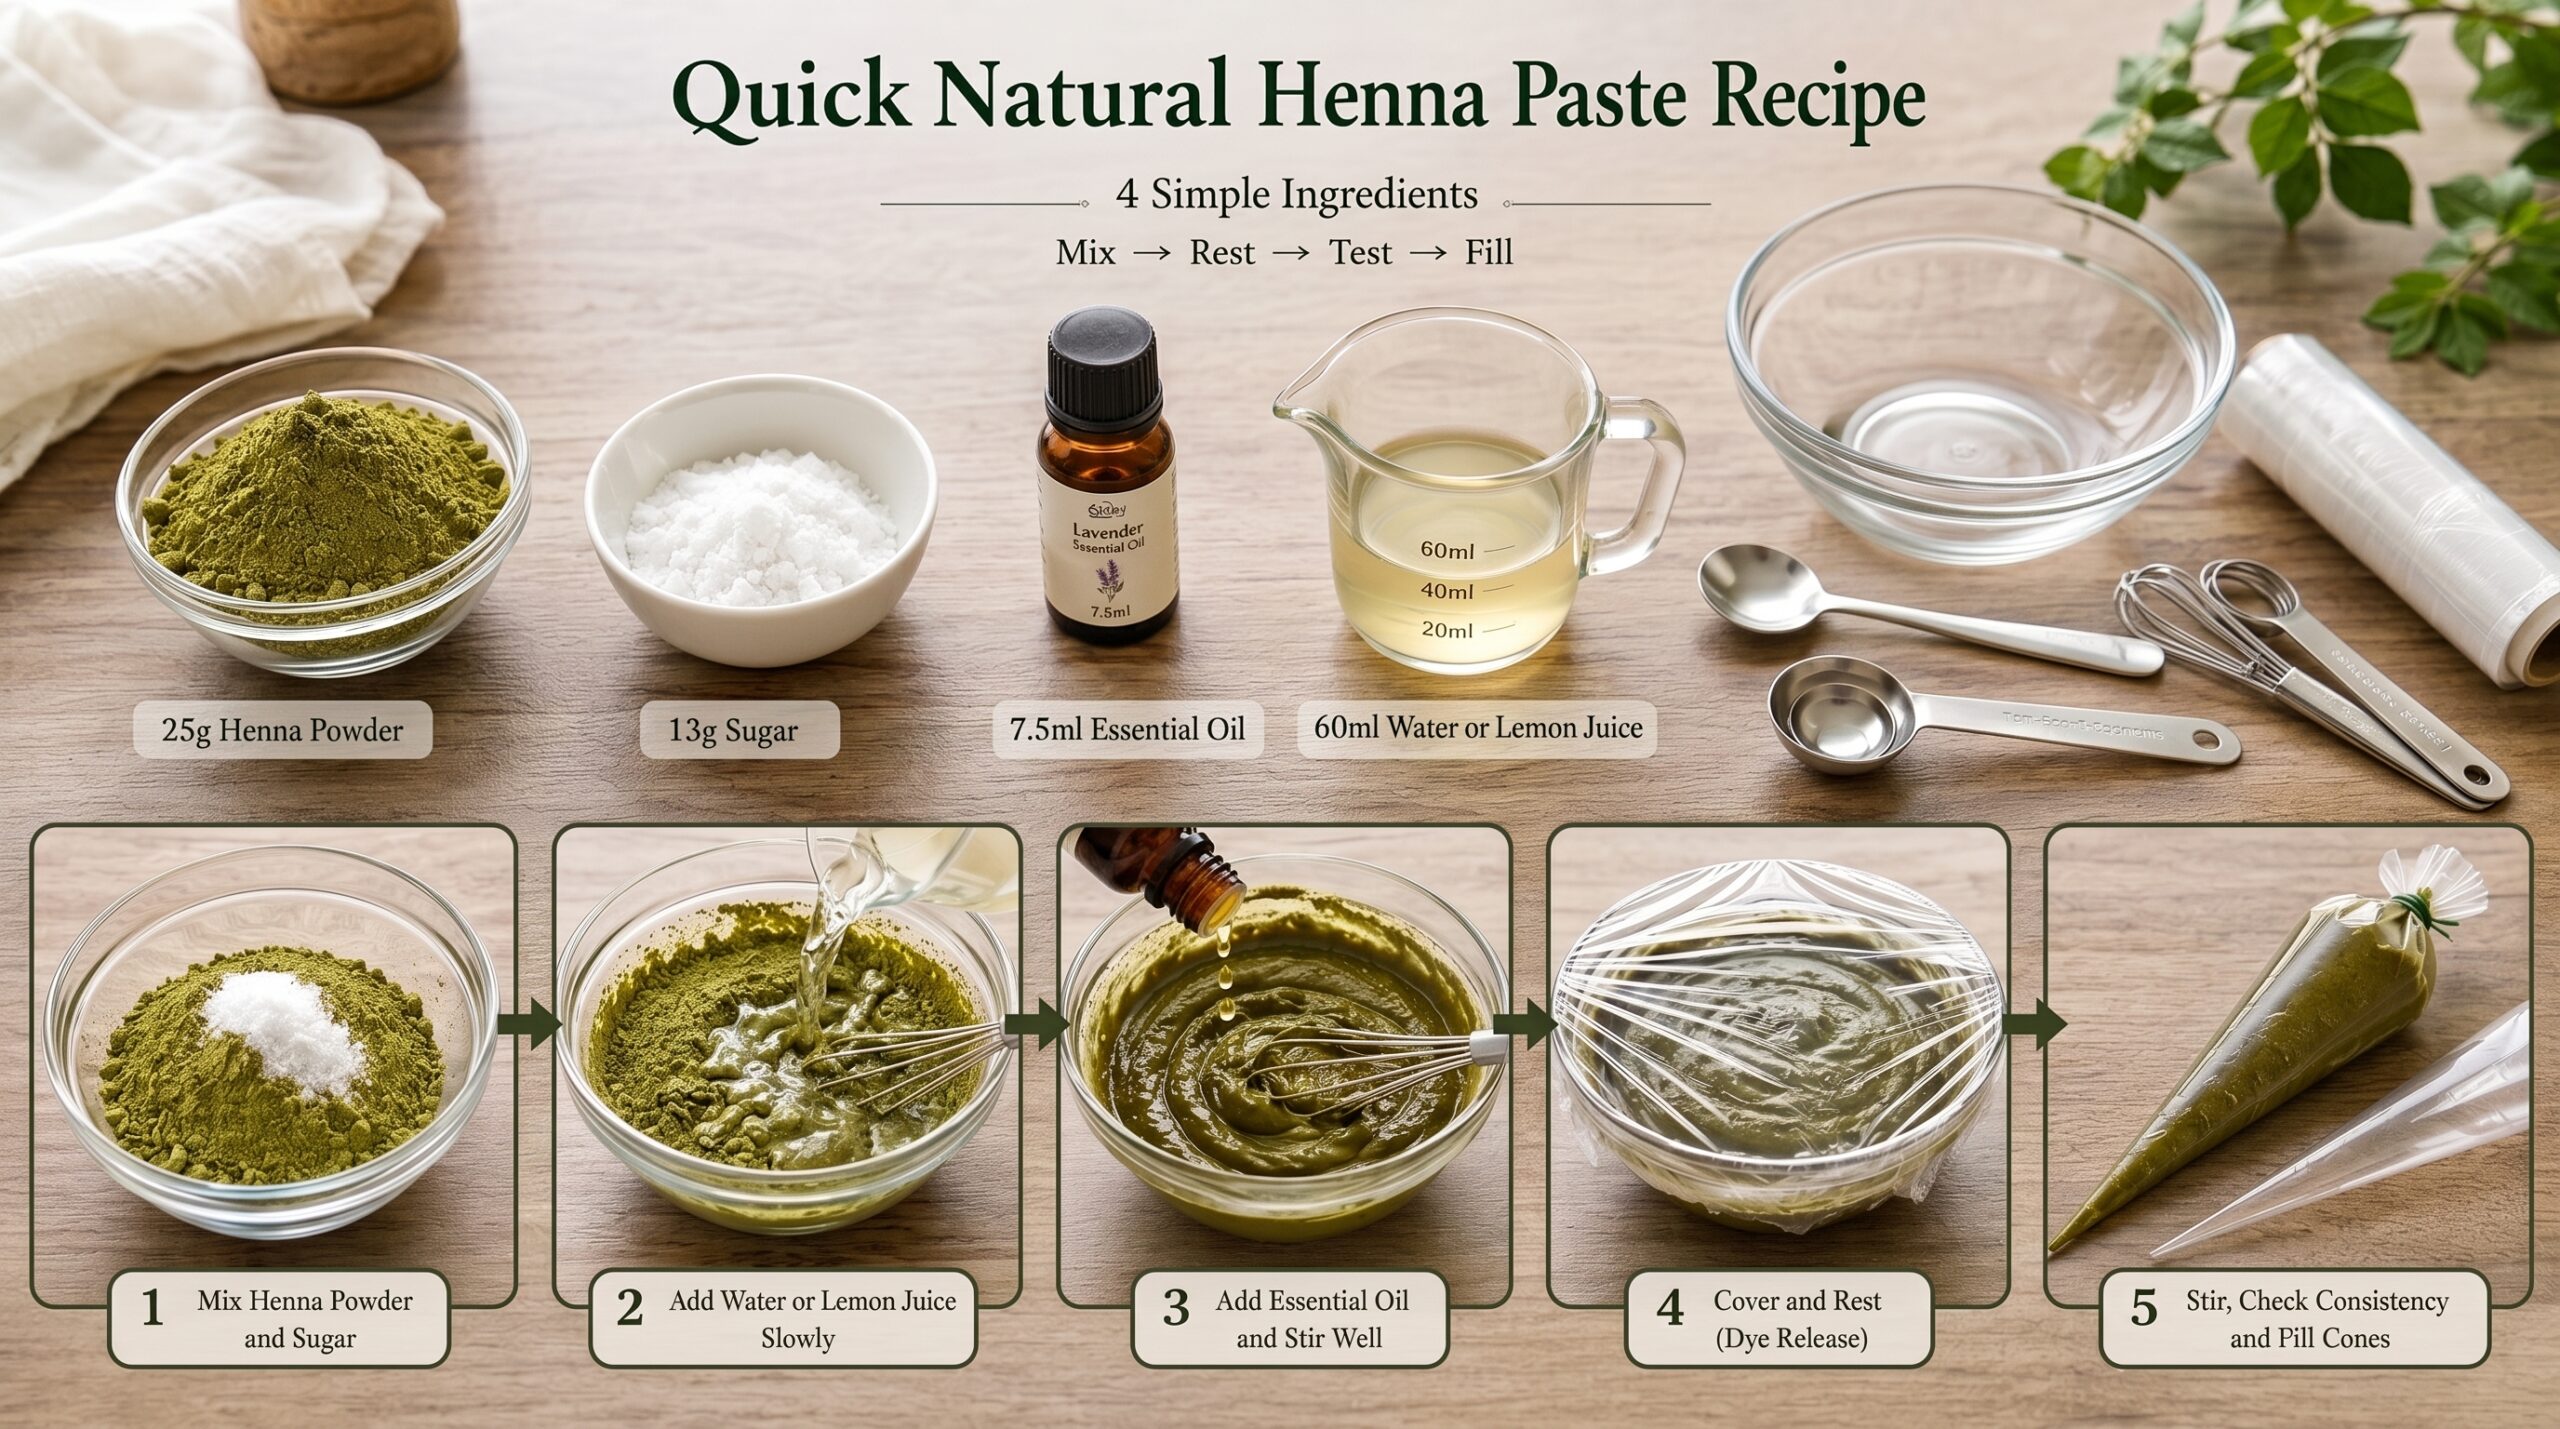
The best beginner henna paste recipe starts with a small batch. It saves powder, reduces waste, and makes texture easier to learn. Once you understand the paste, you can make a larger batch for cones, events, or practice designs. A 25g batch is perfect for filling about 3 to 4 standard cones.
Small Batch (The Learning Mix):
- 25g Henna Powder
- 1.5 Teaspoons Sugar
- 1.5 Teaspoons Essential Oil (Lavender)
- Water (added by the tablespoon until it reaches a thick paste stage)
Larger Batch (For Parties):
- 100g Henna Powder
- 2 Tablespoons Sugar
- 20ml Essential Oil
- Approx. 200ml Water
Remember, the humidity in your UK home can affect this natural henna paste recipe. If it is a rainy day, you might need slightly less water. If you have the heating on high, you might need a touch more.
The reality is that small batches teach you faster.
What Are the Steps for Preparing a Natural Henna Paste at Home?
The best method is to mix slowly, rest the paste, test dye release, adjust texture, then fill cones. Do not rush the liquid stage. Too much liquid can make the paste runny, messy, and hard to control. Follow these steps for a professional-grade finish.
- Sift (Optional): Even if the powder says triple-sifted, sifting it through a nylon stocking can ensure zero clogs.
- Dry Mix: Whisk the powder and sugar together in a glass bowl.
- The Mashed Potato Phase: Add water slowly. Stir until it is thick and a bit lumpy.
- The Oil Phase: Pour in your essential oil. Stir until the oil is fully incorporated.
- Cover & Protect: Place cling film directly onto the surface of the paste so no air touches it. This prevents a crust from forming.
- The Wait: Place it in a warm, dark spot like a kitchen cupboard.
- The Thinning: After dye release, the paste might have thickened. Add water drop by drop until it ribbons off your spoon.
What are the steps for preparing a natural henna paste at home? It really comes down to patience and gradual hydration.
The remarkable thing is that slow mixing gives a smoother paste.
How Long Should Henna Paste Sit Before Use?
Henna paste should sit until the natural dye becomes active. This stage is called dye release. The timing depends on powder type, liquid choice, and room temperature. Warm rooms speed it up, while cold rooms slow it down. On average, a water-based mix takes 6 to 12 hours.
In the UK, our homes can be quite cool. If you leave your henna on a stone countertop in winter, it might take 24 hours to be ready. If you put it near a radiator (not directly on it), it might be ready in 4 hours. You are waiting for the Lawsone to migrate from the plant material into the paste. You will often see the top layer of the paste turn a darker, brownish colour. This is a great sign that henna dye release time is approaching.
The challenge is that timing changes with heat and powder type.
How Long Does Henna Take to Release Dye?
Henna dye release time changes with room temperature, liquid, and powder type. A warm room usually makes dye release faster. A cold room slows it down. That is why a spot test is more useful than only following the clock. Use the table below as a general guide.
| Room Condition | Water Mix | Lemon Juice Mix | What to Do |
| Warm Room (25°C+) | 2 to 4 Hours | 8 to 12 Hours | Check very early! |
| Normal Room (20°C) | 6 to 12 Hours | 12 to 24 Hours | Test before filling cones. |
| Cold Room (15°C) | 12 to 24 Hours | 24+ Hours | Use a warm spot if possible. |
Time helps, but the spot test gives the real answer.
How Do You Know Henna Paste Is Ready?
The easiest way to check henna paste is with a henna paste spot test. Place a small dot on your palm or fingertip. Leave it for exactly five minutes, then wipe it away. If it leaves a bright, pumpkin-orange mark, the paste is ready to use.
If the mark is a pale, faint yellow, the dye has not fully released yet. Give it another two hours and test again. If you leave your paste too long, for several days at room temperature, it demises. This means the dye has oxidised in the bowl and will not stain your skin well. It might even smell sour or off.
Mini Guide:
- Ready: Bright orange mark on the palm.
- Not Ready: Pale yellow or no mark.
- Expired: Brownish-green paste that leaves a faint, muddy mark.
Once the paste is ready, the next job is getting the texture right.
What Should Henna Paste Consistency Look Like?
Good henna paste should move easily but not run everywhere. Many artists describe it as thick yoghurt, toothpaste, or soft mashed potato. The paste should hold a line, spread smoothly, and come out of a cone without breaking or requiring too much hand pressure.
This is the most artistic part of the process. If the henna paste consistency is too thick, your hand will ache from squeezing the cone. If it is too thin, your beautiful lines will bleed together into a puddle.
The Ribbon Test: Lift a spoonful of paste. It should fall back into the bowl in a continuous ribbon. If it gloops off in chunks, it is too thick. Add water. If it runs off like water, it is too thin. Add a teaspoon of powder.
The biggest issue is that beginners add too much liquid too fast.
How Do You Fill Henna Cones Without Clogs or Mess?
Fill henna cones only after the paste is smooth and ready. Use a transfer bag like a carrot bag or a sturdy freezer bag to move the paste neatly. Fill each cone halfway, twist the top tightly, and test the flow on paper before using it on skin.
To avoid the dreaded clog, many artists perform stocking straining. They put the paste into a nylon stocking and squeeze it through the mesh into the cone. This catches any tiny bits of leaf or grit. Knowing how to fill henna cones properly is just as important as the recipe itself.
- Tape your cones: Ensure the tip is the size of a pinhead.
- The Carrot Bag: Put your paste in a large bag, snip the corner, and pipe it into the cones.
- Seal: Use clear packing tape to fold and seal the top of the cone so no paste leaks out the back.
Now the paste is ready, but aftercare also affects the final stain.
How Do You Care for Henna After Applying It?
Good aftercare helps henna stain darker and last longer. Keep the paste on the skin for at least 4 to 8 hours. After removing it by scraping, do not wash with water. Avoid water for the first 24 hours. Let the stain darken naturally from orange to deep reddish-brown.
When you scrape the paste off, the stain will be bright orange. Do not panic! This is normal. Over the next 48 hours, the oxygen in the air will darken the stain.
- Heat is your friend: Keep your hands warm to help the dye develop.
- Balm: Let the design set better by sealing it with lemon and sugar or a little coconut oil.
A good stain depends on both the paste and the care after it.
How Should You Store Homemade Henna Paste?
Fresh henna paste does not last long at room temperature because the dye continues to oxidise. Use it fresh, keep it in the fridge for 2 to 3 days, or freeze extra cones for up to 6 months. Freezing is the best way to preserve the staining power of your hard work.
Learning how to store henna paste allows you to make large batches infrequently.
- Freeze immediately: Once you have filled your cones and used what you need, store the rest in a zip-lock bag and freeze them for later.
- Thaw carefully: When you want to use one, take it out 30 minutes before. It will be as fresh as the day you made it.
- Label: Always write the date on your bag.
The unexpected thing is that old paste can look fine but stain badly.
Is Natural Henna Paste Safe for Skin?
Natural henna is usually safe for most people when made with clean ingredients. Still, you should avoid black henna, chemical-smelling cones, and unknown pastes. Natural henna should smell earthy or herbal, and it should stain orange to reddish-brown, not jet black.
The NHS warns that black henna tattoos can lead to chemical burns and lifelong allergies to hair dye. This is because of PPD. If a paste smells like petrol, ammonia, or bleach, do not use it. If you ask whether henna is safe, the answer is yes, provided it is 100% plant-based and professionally sourced.
Test a small area of skin at least 24 hours before applying a full design, especially on children or those with sensitive skin. Natural henna is a member of the loosestrife family. While rare, some people may have a plant allergy.
The fact is that natural henna should never smell like chemicals.
Why Is My Henna Paste Not Staining Well?
Weak henna stains usually come from old powder, poor dye release, wrong texture, bad storage, or weak aftercare. The good news is that most stain problems are easy to fix once you know where the problem started. It is rarely the skin’s fault and usually the paste’s fault.
If you are wondering why is my henna paste not staining, check these common culprits:
- Old Powder: If it is brown in the bag, it is dead.
- No Dye Release: You did not wait long enough.
- Too Much Water: The dye is too diluted.
- The Cold Factor: If your hands are cold, the dye will not take as well.
- Early Washing: If you wash the paste off with soap and water after one hour, the stain will be very faint.
The honest truth is that most weak stains start before the paste reaches the skin.
Common Mistakes Beginners Make With Natural Henna Paste
The most common beginner mistakes are using old powder, adding too much liquid, skipping dye release, filling cones too early, and using unsafe ready-made cones. Many beginners also skip the sugar, leading to a crumbly experience that ruins their intricate patterns.
Another big mistake is using essential oils that are not skin-safe. Just because an oil is natural does not mean it is safe for a leave-on skin product. Stick to high-quality Lavender or Tea Tree. Lastly, do not use boiling water. It cooks the henna and can actually kill the dye molecules. Room temperature is always best.
Once you know the common mistakes, the process feels much easier.
Final Thoughts: Is Preparing a Natural Henna Paste Worth It?
Yes, preparing a natural henna paste is worth it if you want fresher, safer, and better-looking designs. You control every part of the paste, from powder quality to final texture. You also avoid the guesswork and health risks that come with chemical-filled, shelf-stable cones.
By following this guide, you have moved from being a consumer to a creator. You now know how to select body art quality henna powder, how to balance sugar in henna paste, and how to identify the perfect henna paste consistency. The rich, dark, reddish-brown stain you get from your own handmade batch will always look better than a chemical alternative.
Natural Henna Paste FAQs
How to prepare natural henna?
- Mix fresh body art quality henna powder with sugar, water or lemon juice, and a safe essential oil. Stir until thick and smooth. Then cover it and let it rest until the dye releases. Test it first. If it leaves an orange mark, it is ready.
Is henna good for low porosity hair?
- Yes, but use it with care. Low-porosity hair does not take in moisture easily. So henna can make it feel dry or stiff. Use a light mix, do not leave it too long, and follow with a good conditioner.
Why put sugar in henna?
- Sugar helps henna stay soft, wet, and sticky on the skin. That gives the dye more time to work. Without sugar, the paste can dry fast, crack, and fall off too early.
Is henna good for fungus?
- No, do not use henna to treat fungus. A fungal skin infection needs proper antifungal treatment, often from a pharmacy. Henna may cover the area, but it will not fix the infection.
Why does Vicks help henna?
- Some people use Vicks after scraping off dry henna because it keeps the skin warm and slightly oily. This may help the stain darken. But it is not a must. Avoid it on sensitive, broken, itchy, or irritated skin.