
No products in the basket.
Cold at the top, warm at the bottom? Your radiator likely has trapped air. So, how do you fix it? How to bleed a radiator effectively? Start by turning the heating off and letting the radiator cool. Then, open the bleed valve slowly. When you hear a hiss, air is escaping. After that, close the valve once water appears and check your boiler pressure. Done right, this simple DIY task can fix cold spots, reduce gurgling noises, and help your home warm up faster.
Now, let’s dive in and explore how to bleed a radiator for better heating, so your home feels warmer again.
What Does Bleeding a Radiator Mean?
Bleeding a radiator means opening a small valve to let trapped air out. This air can stop hot water from filling the radiator properly. When the air leaves, the radiator can heat more evenly. This often fixes cold spots near the top. To start with, you should think of your heating system as a loop. For the loop to work, it needs to be full of water.
The interesting thing is that air naturally finds its way into central heating systems over time. Because air is lighter than water, it rises to the highest points. Usually, the top of your upstairs radiators. When this air pocket forms, it acts like a wall, blocking the hot water from reaching the very top of the metal panel. By “bleeding” the radiator, you are simply burping the system to get that air out.
How Do You Know a Radiator Needs Bleeding?
Your radiator may need bleeding if the top feels cold but the bottom feels warm. You may also hear gurgling or bubbling sounds. Some radiators may take longer to heat up. These signs usually mean air has collected inside the radiator. To check this, turn your heating on for about 15 minutes, let the radiators warm up, then carefully feel the panels from bottom to top.
The remarkable thing is that you can often diagnose a heating issue just by touch and sound. If the whole house feels slightly off, a quick walk-around can save you a lot of money on unnecessary repair bills. Use this table to understand what your radiator is trying to tell you:
| Radiator Sign | What It Usually Means |
| Cold top, warm bottom | Trapped air |
| Cold bottom, warm top | Possible sludge or debris |
| Whole radiator cold | Valve, boiler, or flow issue |
| Gurgling or rattling noise | Air trapped inside the radiator |
| Radiator takes ages to get warm | Air or balancing issues |
What Tools Do You Need Before Bleeding?
You only need a few basic tools. Most homes need a radiator bleed key, an old towel, and a small container. Some modern radiators may open with a flat-head screwdriver. Keep everything ready before opening the valve. The challenge is that if you start the job without these, you might end up with a small puddle on your carpet.
- Radiator bleed key: A small, brass or steel tool (available at any DIY shop).
- Flat-head screwdriver: Useful for modern valves if you lose your key.
- Old towel: To catch any stray drips and protect your flooring.
- Small bowl, jug, or cup: To catch the water once the air is gone.
- Cloth: To provide a better grip on a stiff valve.
- Gloves: Optional, but helpful if the radiator is still slightly warm.
Indeed, a radiator key is one of the cheapest yet most important tools in a UK household.
How to Bleed a Radiator Effectively in 8 Safe Steps?
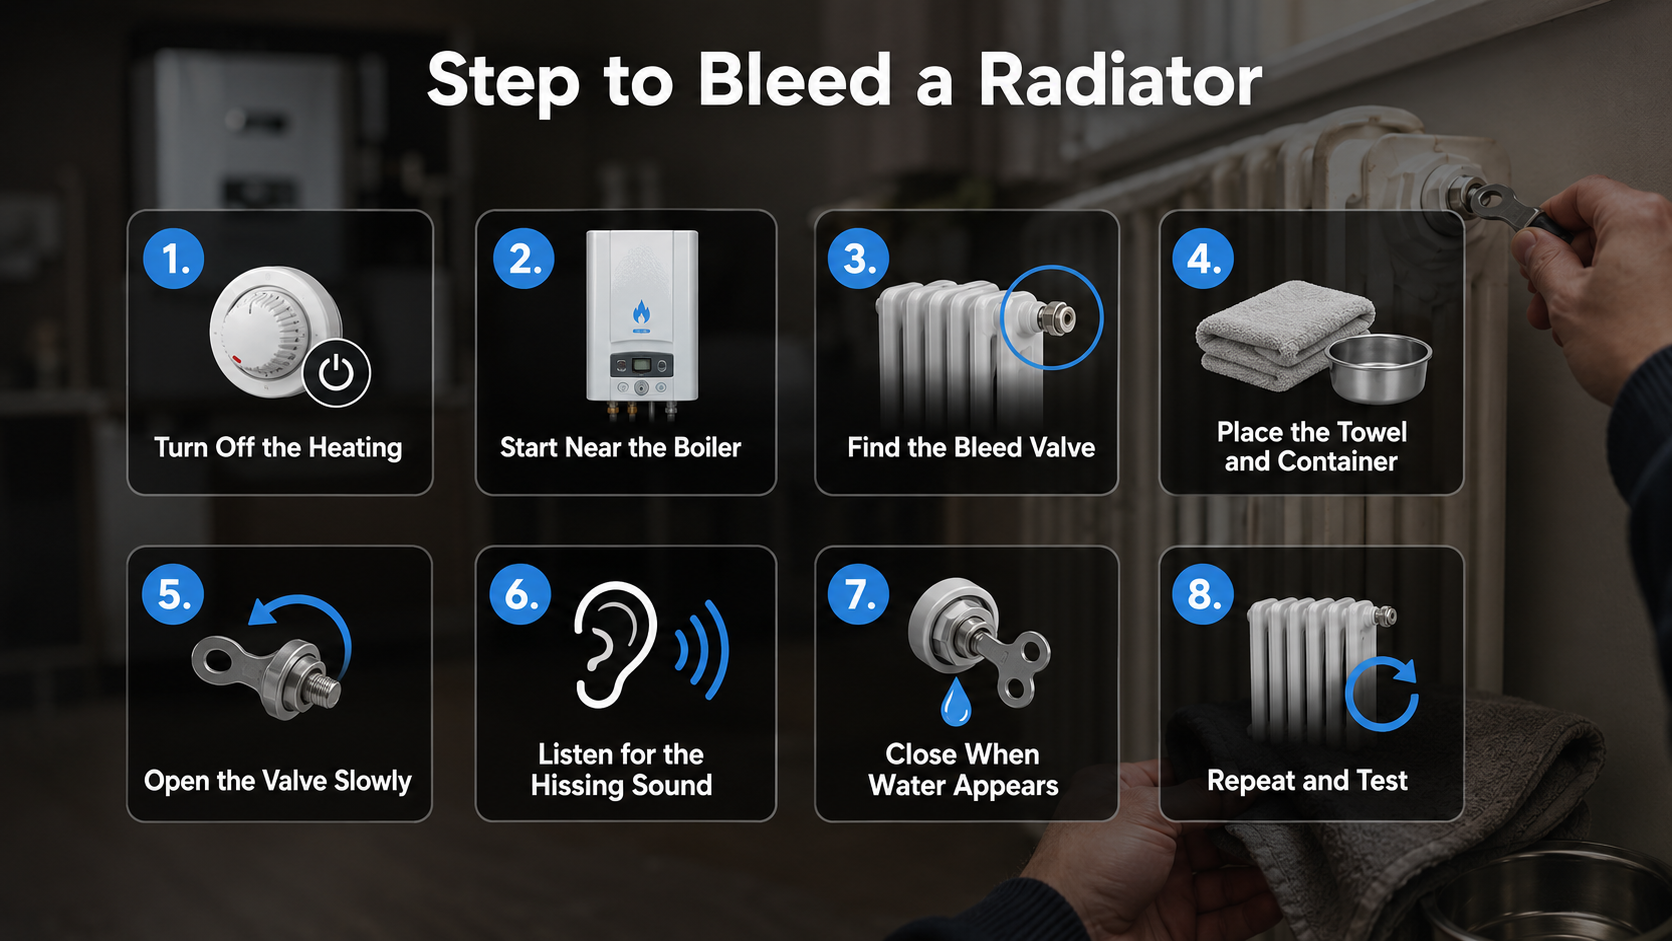
To bleed a radiator safely, turn the heating off and let the radiator cool. Place a towel under the bleed valve. Open the valve slowly with a radiator key. Wait for the hiss to stop. Close the valve when water starts to drip. Following these steps in order ensures you don’t make a mess or drop the system pressure too quickly.
Step 1: Turn Off the Heating
First, ensure your central heating is completely switched off. If the pump is running, it might actually draw more air into the system. More importantly, letting the radiators cool fully prevents you from being sprayed with scalding hot water.
Step 2: Start Near the Boiler
It often helps to start with the radiator closest to the boiler (usually on the ground floor). Then move towards the furthest one, usually moving upstairs. This gives the process a clear order and helps push air through the system logically.
Step 3: Find the Bleed Valve
The bleed valve usually sits on one of the top corners of the radiator. It looks like a small round plug with a square centre. On some modern designer radiators, it may be hidden at the back.
Step 4: Place the Towel and Container
Place your towel directly under the valve on the floor. Hold your cup or jug right underneath the small opening in the valve itself to catch any water.
Step 5: Open the Valve Slowly
Insert the key into the square notch. Turn the key about a quarter to a half turn anti-clockwise. The simple fact is that you should never open it fully, as the plug could fall out, making it very hard to stop the water flow.
Step 6: Listen for the Hissing Sound
You will hear a distinct hissing sound. This is the trapped air escaping. Wait calmly until the hissing stops. This is the core of how to bleed a radiator effectively.
Step 7: Close When Water Appears
As soon as the air is gone, water will start to drip or flow out. Turn the key clockwise to close the valve. Do not overtighten it, as you could damage the seal for next time.
Step 8: Repeat and Test
Go to the next radiator and repeat the process. Once finished, turn the heating back on and check that all panels are heating evenly from top to bottom.
Can You Bleed a Radiator Without a Key?
Some radiators can be bled without a radiator key. Modern valves may work with a flat-head screwdriver or Allen key. Still, a proper radiator key is safer and easier. Do not force a valve if it looks damaged, stuck, or painted over. The surprising part is that many people try to use pliers, which often rounds off the edges of the valve, making it impossible to open later.
If you have a modern radiator, look at the centre of the bleed valve. If there is a straight line across it, a standard screwdriver will work. However, for older Victorian-style radiators, a specific clock-key style tool is mandatory. If the valve does not move with gentle pressure, stop immediately. A small stuck valve can quickly turn into a major leak if you snap it.
Can You Bleed a Radiator While the Heating Is On?
No, you should not bleed a radiator while the heating is on. Hot water can spray from the valve and burn your skin. Turn the heating off first. Then wait until the radiator cools before you open the valve. Furthermore, the pump inside the boiler creates pressure that can introduce more air bubbles into the system if the valves are open while it’s running.
The biggest issue is that if the pump is active, it might be sucking air in through the open bleed valve rather than letting it out. Safety should always come first. Waiting 30 minutes for the system to cool down is a small price to pay for a safe DIY job.
What Should You Check After Bleeding a Radiator?
After bleeding a radiator, check the boiler pressure, valve area, and radiator heat. The pressure may drop slightly because some water can leave the system. Many UK boilers sit around 1.0 to 1.5 bar when off, but always check your boiler manual. If the needle on your pressure gauge is in the red zone, your boiler might not even start.
- Check the boiler pressure gauge (usually on the front of the unit).
- Look for any slow drips around the bleed valves you just touched.
- Turn the heating back on to test the results.
- Feel the radiator after it warms to ensure the cold spots are gone.
- Repressurise the boiler using the filling loop if the pressure is too low.
What matters most is that you don’t ignore the pressure gauge. If the system has lost too much water, the boiler will cut out as a safety measure.
What Mistakes Should You Avoid When Bleeding a Radiator?
The biggest mistakes are opening the valve too far, bleeding while the heating is on, and forgetting to check boiler pressure afterwards. You should also avoid forcing a stuck valve. These mistakes can cause leaks, pressure loss, or hot water splashes. The honest truth is that most problems happen when people rush the job or don’t have the right tools to hand.
- Avoid opening the valve fully: A quarter turn is usually enough.
- Never bleed while the radiator is hot: You risk burns and system imbalances.
- Remember the boiler pressure check: A “dead” boiler is often just a low-pressure boiler.
- Be careful with a stiff valve: Use a lubricant like WD-40 and wait if it’s stuck.
- Fix water leaks quickly: Even a tiny drip can damage floorboards over time.
- Check the valves and boiler first: Not every cold radiator needs bleeding.
What if the Radiator Stays Cold After Bleeding?
If a radiator stays cold after bleeding, trapped air may not be the real problem. The issue could be a stuck TRV pin, low boiler pressure, sludge, poor balancing, or a boiler fault. Check the simple causes first. Then call a professional if the problem continues. Sometimes, knowing how to bleed a radiator effectively isn’t enough because the problem lies deeper in the pipes.
Cause 1: Stuck TRV Pin
The thermostatic radiator valve (the one with numbers) has a small pin inside. If it stays off all summer, the pin can get stuck in the “closed” position.
Cause 2: Low Boiler Pressure
If the pressure is below 1.0 bar, the pump may struggle to push water to the furthest radiators.
Cause 3: Sludge in the Radiator
If the radiator is cold at the bottom but warm at the top, you likely have “sludge” (oxidised metal). This requires a professional flush.
Cause 4: Poor System Balance
If upstairs is hot but downstairs is cold, the water flow might need “balancing” so it spreads evenly.
Cause 5: Boiler or Pump Issue
If none of your radiators are getting warm, the central heating pump may have failed.
What Is the Difference Between Bleeding, Balancing, and Flushing?
Bleeding removes trapped air from a radiator. Balancing controls how hot water moves around the home. Flushing removes sludge and dirt from the heating system. These jobs solve different problems, so it helps to know which one your radiator needs. What if you bleed the radiator and it’s still cold at the bottom? That is a sign you need a flush, not more bleeding.
| Heating Task | What It Fixes | DIY Level | Common Sign |
| Bleeding | Trapped air | Easy | Cold top of radiator |
| Balancing | Poor water flow | Medium | Some rooms much hotter than others |
| Flushing | Sludge or dirt | Professional | Cold bottom of radiator |
| Boiler check | System fault | Professional | No radiators working or error codes |
The reality is that while bleeding is a perfect DIY task, balancing and flushing often require a bit more expertise and time.
How Often Should You Bleed Radiators in the UK?
Many UK homes should check radiators before winter. Bleeding once a year may be enough for newer systems. Older systems may need checking every few months. You should also bleed radiators if cold spots, slow heating, or gurgling sounds return. Consequently, making this part of your annual “home MOT” is a smart move.
The unexpected thing is that if you find yourself bleeding the same radiator every few weeks, you might have a tiny leak somewhere else in the system. Air shouldn’t get in that fast. Frequent air build-up can also be a sign of “electrolytic corrosion” inside the pipes, which might eventually lead to pinhole leaks.
How Can Bleeding Radiators Help Save Energy?
Bleeding radiators can help your heating work better by removing trapped air. When hot water moves properly, rooms warm more evenly. Your boiler may not need to work as hard. This can reduce wasted energy and support lower heating costs over time. The biggest benefit is that your heating can do its job with less wasted effort.
When air is trapped, your boiler stays on longer to try to reach the temperature set on your thermostat. Because the radiator isn’t outputting its full heat potential, the boiler keeps burning gas or using electricity. By removing the air, you allow the radiator to work at 100% efficiency, meaning the boiler can click off sooner.
How Do You Keep Radiators Working Well After Bleeding?
You can keep radiators working well by giving heat room to move. Keep furniture away, clean dust from the panels, check boiler pressure, and use TRVs sensibly. Small habits help your heating system stay more efficient through winter. The reality is that radiator care depends on the age of your system and how well you maintain the area around it.
- Keep furniture away: Don’t put a large sofa right in front of the radiator.
- Avoid drying clothes on them: This causes dampness and blocks heat.
- Dust the fins: Use a hairdryer on a cool setting to blow dust out from the middle of the panels.
- Check pressure monthly: Make sure it stays between 1 and 1.5 bar.
- Exercise the valves: Turn your TRVs from min to max once a month in summer to stop them from sticking.
When Should You Call a Heating Engineer?
You should call a heating engineer if the valve leaks, boiler pressure keeps dropping, or several radiators stay cold. You should also get help if dirty water appears, the valve looks damaged, or the system may need flushing. For any work involving the gas supply or the internal parts of the boiler, you must use a Gas Safe registered engineer.
The fact is that some jobs are just too big for a DIY fix. If you open a bleed valve and the water is thick, black, and smelly, your system is likely corroding from the inside. A professional powerflush is the only way to save your boiler and radiators in that situation.
Final Thoughts on How to Bleed a Radiator Effectively
Learning how to bleed a radiator effectively can help you fix cold spots, reduce radiator noise, and keep rooms warmer. The key is to work safely. Turn the heating off, open the valve slowly, close it when water appears, and check boiler pressure afterwards. It is a simple DIY job that can make a massive difference to your comfort.
The surprising part is that such a small task can have such a big impact on your energy bills and peace of mind. A few careful minutes can turn a cold room into a cosy one again.